
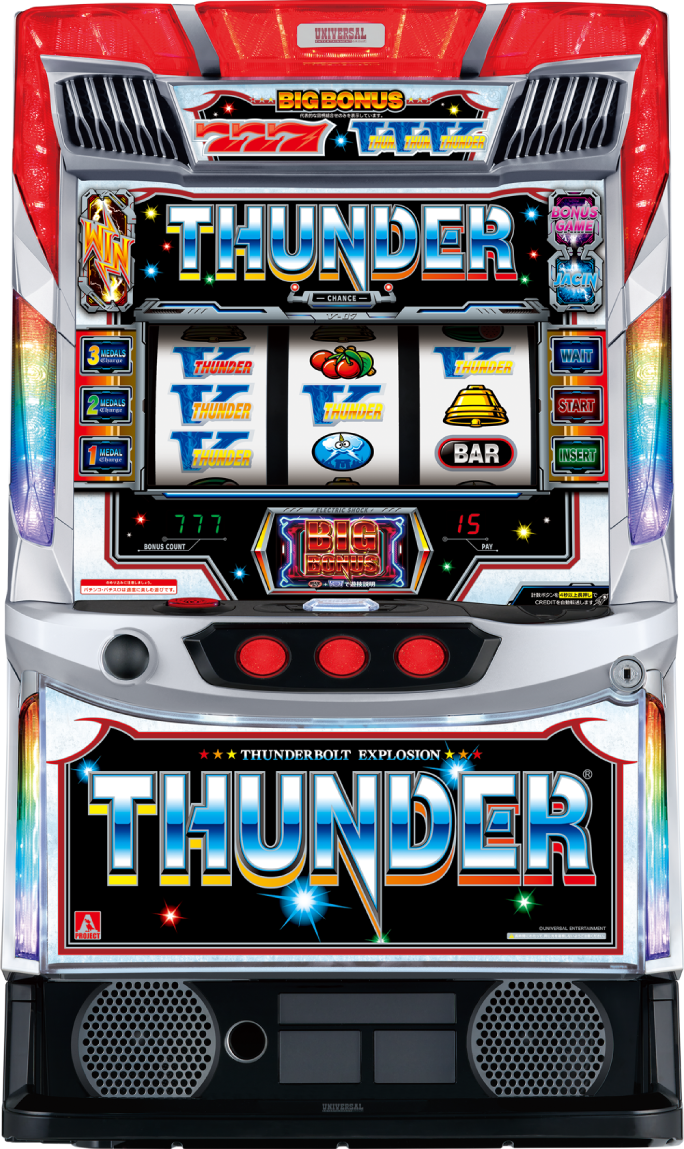
| Model Name | LB/スマスロサンダーVHA |
|---|---|
| Certification No. | 5S0895 |
| Net gain per game | - |
| Official Site | — |
|---|---|
| Official social media | — |
| Wikipedia | — |
Setting Hints
▼Bonus probability differs by setting
| setting | BB | RB | Combined bonus rate |
| Setting 1 | 1/277.7 | 1/434.0 | 1/169.8 |
| Setting 2 | 1/275.4 | 1/394.8 | 1/161.0 |
| Setting 5 | 1/270.8 | 1/344.9 | 1/149.3 |
| Setting 6 | 1/264.3 | 1/313.6 | 1/138.8 |
▼Minor Symbol Probability differs by setting
If you use UNIMEMO, you can check the Appearance Rate of each minor symbol.
| Minor symbol odds by setting | |||
| setting | Bell A | Bell B | Bell combined odds |
| Setting 1 | 1/16.3 | 1/52.9 | 1/12.5 |
| Setting 2 | 1/15.8 | 1/62.1 | 1/12.6 |
| Setting 5 | 1/15.3 | 1/53.9 | 1/11.9 |
| Setting 6 | 1/14.8 | 1/47.1 | 1/11.2 |
| setting | Cherry B | Watermelon A |
| Setting 1 | 1/13.2 | 1/108.3 |
| Setting 2 | 1/12.1 | 1/109.6 |
| Setting 5 | 1/12.5 | 1/99.6 |
| Setting 6 | 1/12.2 | 1/101.9 |
| setting | Watermelon B | Watermelon combined odds |
| Setting 1 | 1/322.8 | 1/81.1 |
| Setting 2 | 1/329.3 | 1/82.2 |
| Setting 5 | 1/296.5 | 1/74.6 |
| Setting 6 | 1/303.4 | 1/76.3 |
▼BB (Bonus game) minor symbol odds differ by setting
BB (Bonus game) minor symbol odds differ by setting, and by playing while aiming for TRIPLE V Symbols on the left Reel, you can identify the Winning combination.
Also, if you use UNIMEMO, you can check the Appearance Rate of each minor symbol.
| Stop patterns during BB (Bonus game) | |
| Stop pattern | Flag |
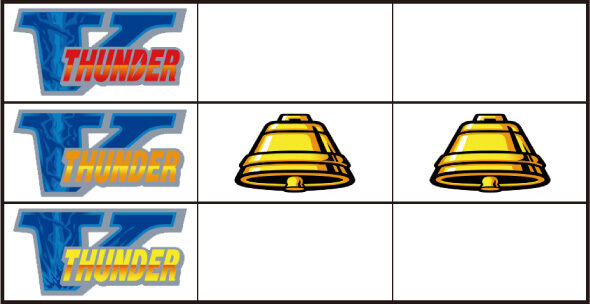 |
Bell A |
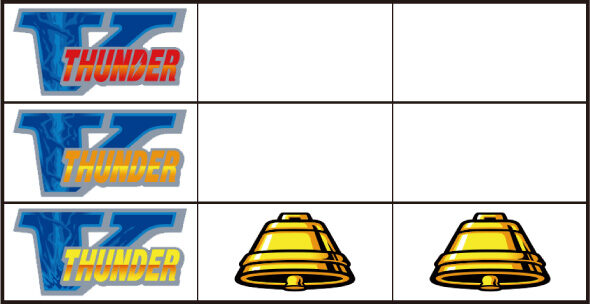 |
Bell B |
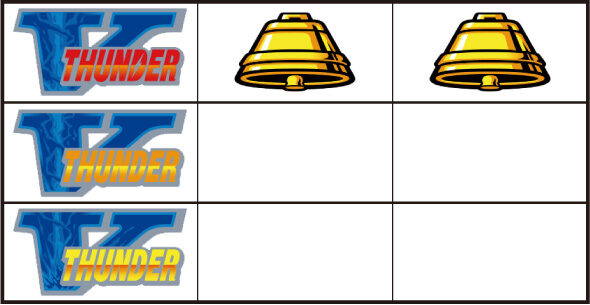 |
Bell C |
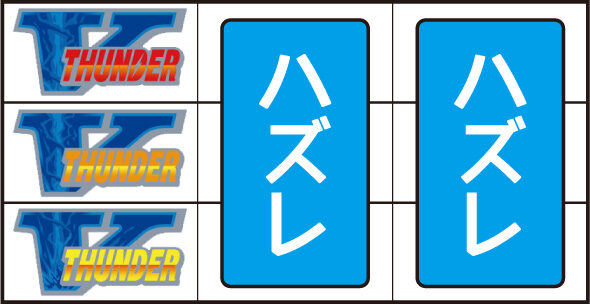 |
bonus-indicating 15-coin symbol combination |
| BB (Bonus game) minor symbol odds | ||
| setting | Bell A (Middle row [V·Bell·Bell]) |
Bell B (Bottom row [V·Bell·Bell]) |
| Setting 1 | 1/1.2 | 1/7.0 |
| Setting 2 | 1/1.3 | 1/5.8 |
| Setting 5 | 1/1.2 | 1/7.0 |
| Setting 6 | 1/1.3 | 1/5.8 |
| setting | Bell C (Top row [V·Bell·Bell]) |
bonus-indicating 15-coin symbol combination (V FLASH) |
| Setting 1 | 1/36.0 | 1/10922.7 |
| Setting 2 | 1/36.0 | 1/10922.7 |
| Setting 5 | 1/24.3 | 1/436.9 |
| Setting 6 | 1/24.3 | 1/436.9 |
▼Simultaneous bonus win likelihood differs by setting
Bonus Win likelihood differs according to the Winning combination.
| Simultaneous bonus win likelihood | |||
| setting | Replay | Bell A | Cherry A |
| Setting 1 | 0.29% | 0.050% | 0.30% |
| Setting 2 | 0.30% | 0.048% | 0.30% |
| Setting 5 | 0.32% | 0.047% | 0.30% |
| Setting 6 | 0.35% | 0.045% | 0.30% |
| setting | Cherry B | Watermelon A | Watermelon B |
| Setting 1 | 0.52% | 0.50% | 1.48% |
| Setting 2 | 0.50% | 0.50% | 1.51% |
| Setting 5 | 0.55% | 0.46% | 1.36% |
| Setting 6 | 0.58% | 0.47% | 1.39% |
| Effective bonus Appearance Rate by Flag | |||
| Standalone | |||
| setting | VBB | Red 7 BB | RB |
| Setting 1 | 1/5041.2 | 1/1927.5 | 1/1680.4 |
| Setting 2 | 1/5041.2 | 1/1872.5 | 1/1524.1 |
| Setting 5 | 1/5041.2 | 1/1872.5 | 1/1394.4 |
| Setting 6 | 1/4681.1 | 1/1872.5 | 1/1310.7 |
| Replay | |||
| setting | VBB | Red 7 BB | RB |
| Setting 1 | 1/9362.3 | 1/9362.3 | 1/5461.3 |
| Setting 2 | 1/5041.2 | ||
| Setting 5 | 1/4369.1 | ||
| Setting 6 | 1/3855.1 | ||
| Cherry B | |||
| setting | VBB | Red 7 BB | RB |
| Setting 1 | 1/9362.3 | 1/9362.3 | 1/5461.3 |
| Setting 2 | 1/5041.2 | ||
| Setting 5 | 1/4369.1 | ||
| Setting 6 | 1/3855.1 | ||
| bonus-indicating symbol combination A | |||
| setting | VBB | Red 7 BB | RB |
| Setting 1 | 1/2730.7 | 1/10922.7 | 1/2184.5 |
| Setting 2 | 1/2730.7 | 1/10922.7 | 1/1927.5 |
| Setting 5 | 1/2730.7 | 1/9362.3 | 1/1638.4 |
| Setting 6 | 1/2621.4 | 1/9362.3 | 1/1456.4 |
| bonus-indicating symbol combination B | |||
| setting | VBB | Red 7 BB | RB |
| Setting 1 | 1/8192.0 | 1/8192.0 | – |
| Setting 2 | 1/8192.0 | 1/8192.0 | |
| Setting 5 | 1/7281.8 | 1/7281.8 | |
| Setting 6 | 1/7281.8 | 1/7281.8 | |
| bonus-indicating symbol combination C | |||
| setting | VBB | Red 7 BB | RB |
| Setting 1 | 1/2427.3 | 1/2730.7 | 1/1310.7 |
| Setting 2 | 1/2427.3 | 1/2730.7 | 1/1191.6 |
| Setting 5 | 1/2340.6 | 1/2730.7 | 1/1040.3 |
| Setting 6 | 1/2340.6 | 1/2621.4 | 1/949.8 |
| bonus-indicating symbol combination D | |||
| setting | VBB | Red 7 BB | RB |
| Setting 1 | 1/3640.9 | 1/10922.7 | 1/8192.0 |
| Setting 2 | 1/3640.9 | 1/10922.7 | 1/8192.0 |
| Setting 5 | 1/3640.9 | 1/10922.7 | 1/6553.6 |
| Setting 6 | 1/3449.3 | 1/9362.3 | 1/5957.8 |
| bonus-indicating symbol combination E | |||
| setting | VBB | Red 7 BB | RB |
| Setting 1 | 1/7281.8 | 1/3120.8 | – |
| Setting 2 | 1/6553.6 | 1/3120.8 | |
| Setting 5 | 1/6553.6 | 1/3120.8 | |
| Setting 6 | 1/6553.6 | 1/2978.9 | |
▼BB End screen has hint elements
Multiple LCD screens at the bottom of the Reel may appear when BB ends.
A Setting hint is shown depending on the screen type.
| BB End screen hints | |
| Basic screen | |
| End screen | Hint detail |
| Default (Unlit) | Basic pattern |
| Lit | Setting 2 or higher is highly likely |
| During 1G streak | |
| End screen | Hint detail |
| Tarot | Basic pattern |
| Tarot + meteor | Setting 2 or higher is highly likely |
▼RB End screen has hint elements
Multiple LCD screens at the bottom of the Reel may appear when RB ends.
A Setting hint is shown depending on the screen type.
| RB End screen hints | |
| End screen | Hint detail |
| Default | Basic pattern |
| IKKAKU-KUN APPEARS | Setting 5 or higher is highly likely |
*According to HAZUSE research.


